"Resign yourself, Catherine! Shops must be visited! Money must be spent! Do you think you could bear it?" - Northanger Abbey
Showing posts with label HSF 13. Show all posts

Tuesday, December 3, 2013

HSF Challenge #23 Gratitude - Sleeveless Spencer

The Challenge: #23 Gratitude

Fabric: Gold coloured 'silk'.

Pattern: Well I started with the S&S Regency gown pattern as my 'base' and made considerable modifications. Which included shanging the shoulder seam to the back, and added a collar. Also changed gathers to darts.

Year: 1795-1820

Notions: Green ribbon. Gold embroidery thread.

How historically accurate is it? It was inspired by several blog posts by others about sleeveless spencers. This one. This one. And this one.

Hours to complete: about 5-6 hours. all hand sewn.

First worn: N/A

Total cost: I'm not sure it was made from my fabric stash. Can't be more than £5.


Above is my sketch I did of how I wanted it to look. I ended up dropping the peplum at the back I also changed how the closure worked.
I sewed the ribbon all round leaving a 'tie' on one 'flap' and a look on the other. It was pure lazyness as I didn't want to bother with buttons and hook & eye.
I'm fairly please with the result the fabric was a bit of a nightmare to work with...didn't like pins and kept sliding about and fraying....but managed to wrangle it. The only problem was pressing it. It didn't want to lay flat.

Monday, December 2, 2013

HSF Challenge #24 Re-Do - Bib Front Regency Dress

The Challenge: #24 Re-Do

The Challenge you are Re-do-ing: #4 Embelishment

Fabric: Muslin.

Pattern: I used S&S regency gown pattern as my bodice but with modifications (see post below). the skirts were based on the pattern in the janet arnold book patterns of fashion.

Year: 1800-1820 - Regency

Notions: Embroidery floss. Ribbon.

How historically accurate is it? Well I've taken inspiration from both patterns of fashion and costumes in detail. Everything bar the long skirt side seam was done by hand.

Hours to complete: About a week just doing little stints of sewing when I could.

First worn: N/A (its for 2014)

Total cost: approx. £25


The first thing I did was cut out the peices and do the embroidery. I'm really pleased with how the bluebells came out.


After I'd made up the bodice and fitted it...

I then attached the 'skirts' to the 'bib' and then the skirts to the bodice.


Then attached the ribbon 'tie' to the waistband.
I think next time round I will have the skirt further back so the overlap is nearer the sides than the front.

 The skirts were a little too long. So I added in a tuck.

 I then pinned up the hem and thought 'hmmmm....I might need another tuck in there'.
Being lazy I'm gonna leave it for now. I added a waist stay on the inside. Sewed up the hem and ta da! Finished.


Wednesday, November 27, 2013

HSF Challenge #24 Re-Do - Fob watch chatelaine

The Challenge: #24 Re-Do

The Challenge you are Re-do-ing: #19 Wood Metal Bone

Fabric/Notions: Blue ribbon, watch, 'pearl', hair clip, cameo (it was in a pack of cameos for card crafts).

Pattern: N/A

Year: Regency
 

How historically accurate is it? Well I have seen images of regency gents with fob watches on ribbons...and in the most recent bbc series of emma the title character had one on a chain/ribbon.

Hours to complete: 2 hours (glue had to dry.)

First worn:N/A

Total cost:£18 (most of that was the watch cost)


 Above is the original fob watch necklace I used as I can't make a watch. lol! I used 1 meter of ribbon - interfacing the 'point'. I attached the ribbon to the metal hair clip. then sewed the watch on one point and a small 'pearl' from another necklace to the other point. Then glued a 'cameo' on the clip to cover up my sewing.

Above is the 'regency' version and the one below is my 'cosplay' version with its additional TARDIS key. ;)

Monday, November 4, 2013

HSF Challenge #22 Masquerade - Shirt, Waistcoat and Trousers

For this challenge its more of a challenge as rather than one item I wanted to pull together a whole ensemble of different elements from different eras to make my 'masquerade costume'. Which for those who know is actually a Doctor Who costume for a certain event in November.


I had originally intended to do a full Edwardian parallel to the eighth doctor's outfit, but found myself running out of time, funds and fabric. So I made some comprimises and adjustments. The jacket was taking me a long time to do. The skirt I'd done my wearable mock up in green but realised I wouldn't have enough matching fabric left so changes to high waisted trousers instead. My shirt would also be made by me and with a detachable collar.

So that left me with:
Jacket - Edwardian
Shirt - Edwardian
Trousers - 1930's
Waistcoat - Indeterminate but hoping it would fit 1930's or Edwardian
Cravat - Misc

Now so far I have completed the waistcoat for another challenge. The Shirt I completed but changed the 'style' of and the Trousers were using my TNT go to trouser pattern. The Jacket I have abandoned...in favor of something shop bought.

The Challenge: #22 Masquerade

Fabric: Brown Twill,  silk haboutai, white sheeting


Pattern: Trousers (Eliza M Swing trousers), Waistcoat (McCalls
6149), Cravat (No Pattern), Shirt (Simplicity Lisette 2246 modified, collar self drafted.)

Year: Various. From Edwardian to 1930's.

Notions: Polymerclay buttons (made myself), thread, zip, hook and bar.

How historically accurate is it? Well I wasn't going for absolute accuracy as this is meant as a cosplay outfit....it was more historically inspired.


Hours to complete: As there were so many elements it took me several weeks to do.

First worn: It will get worn at the Doctor Who 50th Anniversary at the excel in November.

Total cost: I've lost count. With so many different elements. 


Wednesday, October 16, 2013

HSF Challenge #21 Green - Green Ribbon Decoration

The Challenge: #21 Green

Fabric: Green Ribbon


Pattern: N/A I read a few tutorials and made it up as I went along.

Year: Regency 1800-1820

Notions: Cameo (actually its what people use for card crafts but seemed to fit perfectly

How historically accurate is it? Well it looks authentic to me. The cameo doesn't look obviously plastic.

Hours to complete: Oh, it was very quick did it in one evening.

First worn: N/A

Total cost: It was all out of my stash so only a couple of quid.


The cameo is glued onto the centre of the cockade. I then attached it to my bonnet.

Monday, September 30, 2013

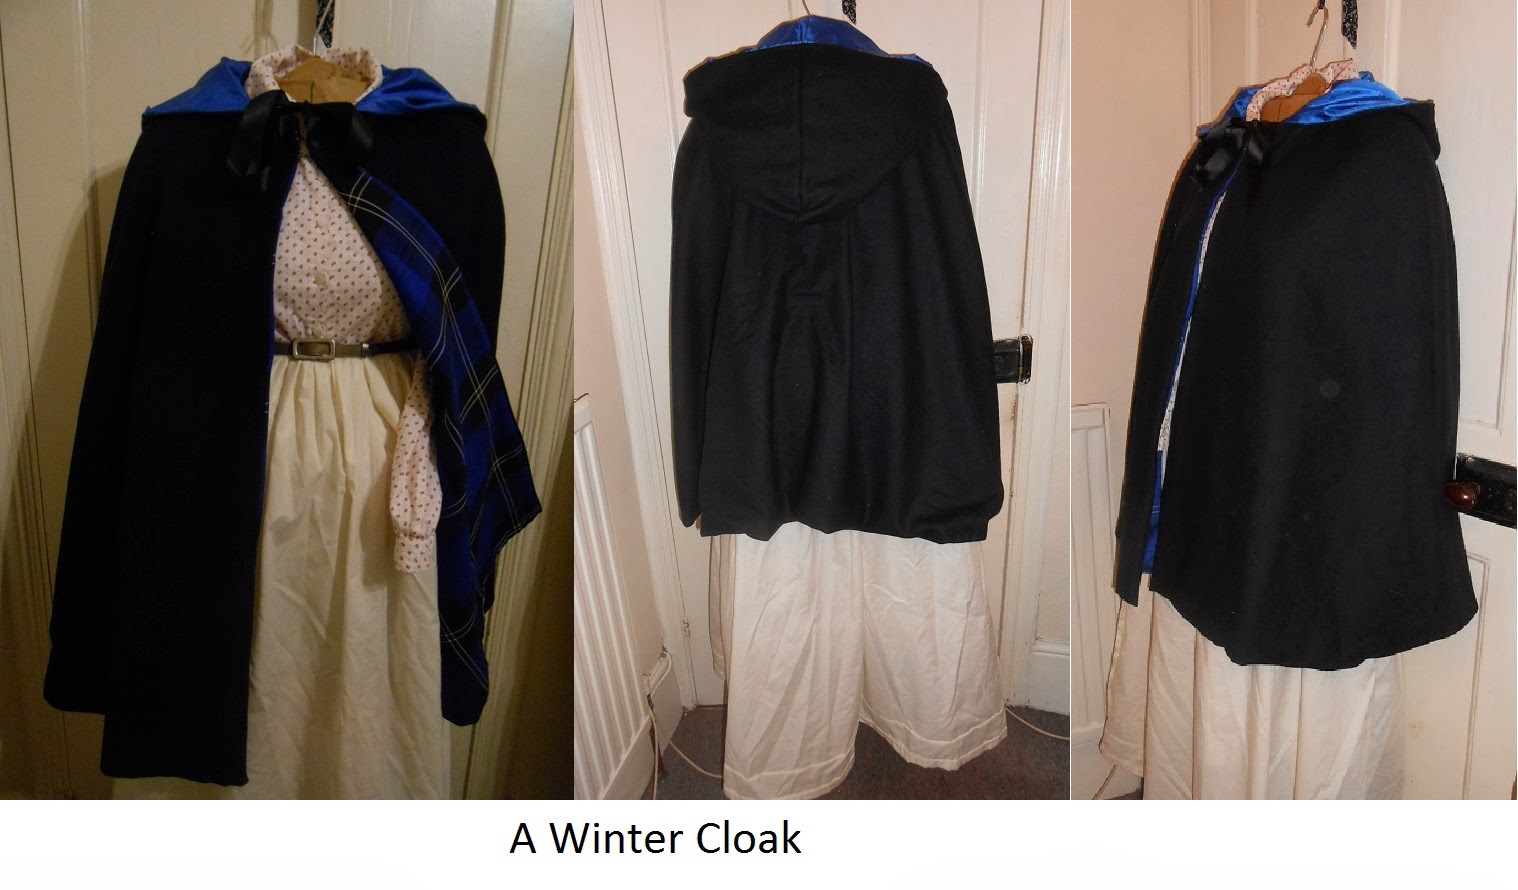
HSF Challenge #20 Outerwear - Cloak

The Challenge: #20 Outerwear

Fabric: Melton wool (turns out its 50%wool / 50% poly), polysilk lining.

Pattern: Simplicity 5786. Chose view A but cut it shorter than on the cover.

Year: 1840s? Victorian? I hope it can be used for a few eras though.

Notions: Thread, buttons, ribbon.

How historically accurate is it? I find it hard to judge. I tried to get the spirit of the time right. The tartan is a nod to queen victoria of course.

Hours to complete: 3 hours.

First worn: Well worn it round the house a few times. But hope to wear it out on holiday.

Total cost: Well the wool was a bargain price. The tartan and the other lining was leftover fabric from another project...so I guess so I say £20-25?


It was quite simple constructionwise, got the basics done quickly.
 I pinned the cloak and hood together for below picture. As you can see I lined the hood in blue silky material.
 But there was a problem....I used up it all on the hood lining. So I had to go serching for some more. Now the stuff I planned to use had gone walkabout.
 ...and what I had left either was the wrong colour or there wasn't enough of it.
Taking inspiration from costumes in detail. Decided to use different fabric to line front and back. Tartan in the front and white silky in the back.
I also took an idea from costume in detail and added a loop at back of the cape inside so if it gets windy I can pass a ribbon or belth through it and tie it snug to my waist.

I used 2 hook & eye plus a ribbon for closures. Inspired by the little cape I saw at Kensington Palace.
In Queen Victoria display at Kensington Palace
I have wanted a cloak ever since I saw those old 'Scottish Widows' advert. And thought wow that looks so fab...I need to get a cloak like that. lol!

Sunday, September 29, 2013

HSF Challenge #19 Wood, Metal, Bone - Bow Clip

The Challenge: #19 Wood Metal Bone

Fabric: Cotton twill

Pattern: Self Drafted

Year: N/A

Notions:
metal clip, wire.
 
How historically accurate is it? Not sure. this was one of those I have no time left I'll throw something together project. I thought bow ties are cool. And there seems to have been some kinda bow in history so I'll do that.

Hours to complete: 1 hour.

First worn: 21st september

Total cost: Just made from scraps. So can't really judge price.


Thursday, August 29, 2013

HSF Challenge #16 Seperates - Waistcoat

The Challenge: #16 Seperates

Fabric: Poly suiting, polysilk lining

Pattern: McCalls 6149

Year: Well this was inspired by the eighth doctor (doctor who) waistcoat. Which I think is 1870's. But feminised. I think it actually has a 1930's feel to it.

Notions: 3 buttons, interfacing

How historically accurate is it? weeeelllll....as its based on a tv costume and I haven't pinned the year down I'll leave it up to you to decide.

Hours to complete: lost count but about 2 weeks.

First worn: to test the fit yesterday

Total cost: approx £12

Finished waistcoat- you can see I added my tardis key to my pocketwatch chain

Sans buttons

Thursday, July 25, 2013

HSF Challenge #6 Stripes - Striped Regency Dress

So I know its a bit late but I only found the material and had the idea for the dress a few weeks ago. Its my striped regency dress (which also works as a modern maxi dress.)
I wasn't sure if I should make it short sleeved or sleeveless.

In the end I went for sleeveless, although I still have the sleeves if I change my mind later. This is it in regency mode. With a habit shirt underneath and waist petticoat.

 The buttonholes are done by hand...actually its all done by hand as usual. I put a belt I had in my wardrobe with it. Putting my new dress form to use.


The Challenge: #6 'Stripes'

Fabric: White and blue striped cotton

Pattern: Sense & Sensibility Regency Gown (with a few modifications)

Year: 1790-1820

Notions: vintage buttons, bias binding


How historically accurate is it? Its accurate as far as the pattern is accurate. Right kind of material and 'look'. Hand Sewn.

Hours to complete: Well its taken me just over a week.

First worn: N/A

Total cost: approx £15


Wednesday, July 17, 2013

HSF Challenge #15 White - Regency Waist Petticoat


The Challenge: #15 'White'
I chose an 'off' white fabric for my waist petticoat. It was very simple. I took 2metres of fabric cut in half so each peice was 45inches wide and 1metre high (yes I know I'm mixing measurements). Sewed up the two side seams leaving about 15cm at the top on one side only and made a placket.
Cut the right length bias binding to fit my waist. Pleated the pack and gathered the front then attached the binding. Added the hook & eye then straps.

Fabric: Off-white polycotton.

Pattern: No pattern. Self drafted.

Year: 1790-1820

Notions: Some kind of tape (it was given to me so I haven't a clue its name), bias binding, hook & eye.

How historically accurate is it? Other than the material composition I think its accurate shapewise and does what it needs to do.

Hours to complete: I lose track coz I put down and pick up. A couple of days all handsewn.

First worn: Well tried it on for photoshoot today.

Total cost: approx £9

Saturday, June 29, 2013

HSF Challenge #13 Lace and Lacing - Regency Short/Half Stays

The Challenge: #13 Lace and Lacing

Fabric: Floral polycotton, Cream Cotton Twill

Pattern: I started with the Daffydown Dilly Wrap Stay Pattern, but modified it to lace at the back and have adjustable straps.

Year: 1790-1815. I intended it to be more of a transition peice. Inspired by seeing an image of some 'jumps' and thinking of combining the regency short stay with the jumps. As I needed a longer stay but not one that went over my hips.

Notions: Bias binding, cotton tape, embroidery floss and an old cheap corset which I cannibalised for eyelets.

How historically accurate is it? - I was inspired by various images but it developed out of what my needs were to acheive the correct sillouette. The materials aren't exactly period but no one will see under my petticoat and dress.


Hours to complete: I lost count. Been picking it up and putting it down for months.

First worn: N/A

Total cost: Erm....lost track. I only bought the notions really and the cotton twill everything else was from my stash.


Notes: After cutting out the modified pattern I tacked the fashion fabric and lining together and attached the eyelets.

I drew out a rough approximation of where I wanted the cording to go.
Made the hole for the busk to go in. Then started the long process of cording using wool.
Then bound the edges -adding in drawstring on top edge- trimming a little length off the bottom so the curve would allow it to sit above my hips.

Made eyelets on the straps and laced up the back. Using spiral lacing. My first attempt.
Handmade eyelets
 And finally finished the stays. They are longer than short stays but not as long as full stays. A lot of it is me just using what I can find. If I got into re-enacting I'd do it again but with accurate stuff but at the moment these will do.
Back (spiral laces)

Front
This means I can now start on the other layers of my regency outfit.

Monday, May 27, 2013

A regency shift - HSF #11 - Squares, rectangles and triangles


The Challenge: 11 - squares, rectangles and triangles

Fabric: Cream Polycotton

Pattern: No pattern I just...stumbled through it from looking at other shifts and chemises online with a little help from the blogosphere.

Year: approx 1800 was my intention

Notions: ribbon, thread and embroidery floss

How historically accurate is it? As I copied a lot of images of accurate garments apart from the fabric choice and unique construction order I would think it was accurate.

Hours to complete: about 12 hours...but really it was 2 afternoons and an evenings sewing time including time taken for embroidery.

First worn: N/A

Total cost: I used leftover fabric from another project I think just over 2 metres and notions were from my stash. So it was free technically speaking but probably be under £10 in all.


Notes: Well I expected a shift to be simple and stright forward. But it wasn't...and least without a commercial pattern it wasn't. I understood the principal of the construction but certain elements bemused me.
Firstly the gussets for the sleeves. I took them apart and resewed them so many times (as you can see in the below image there was something not quite right).


Every explination I read got to the same point then became vague/confusing and quite frankly I was really annoyed. Thanks to helful suggestions from various avenues I realised what I'd been doing wrong. I blame all those instructions for sewing made for people who machine sew. Just makes it over complicated. I'll do a step by step tutorial of MY way one day. (As a handsewer I am a bit more dexterous than a machine sewer so can do things differently).

The neckline was a bit of a guess....and a bit of a mess. I didn't have enough fabric to make bias binding so I had to fold over the neckline. Which is why it was a bit messy.
I added some embroidery detail on the centre back where a thread had pulled in the fabric to cover it up and stop it laddering.
I also embroidered some simple detail on the 'sleeves'. As I thought it was a bit plain as is. 
I hope to make another longer one in another material as I can't afford proper linen at the moment. Next in my regency wardrobe will be a bodiced petticoat....and I have a special idea with that.

Thursday, May 16, 2013

Bonnet and Veil - HSF #10 - Literature

You are getting two for the price of one.

The retrimmed bonnet
"Look here, I have bought this bonnet. I do not think it is very pretty; but I thought I might as well buy it as not. I shall pull it to pieces as soon as I get home, and see if I can make it up any better." Pride & Predudice."
The Veil "...very little wite satin, very few lace veils"  Emma.

I've taken my inspiration from some images from pinterest.

Source: flickr.com via Lady on Pinterest

Source: reg-ency.com via Lady on Pinterest


The Challenge: #10 Literature

Fabric: Veil was some chiffon. The bonnet was a straw hat I cut up and modified with a linen type material.

Pattern: No pattern used.

Year: 1790-1820

Notions: Self fabric biasbinding, thread, feather.

How historically accurate is it? I tried to give a similar shape to the bonnets from fashion plates so guessing its fairly accurate. Probably should have covered the straw in fabric but it seemed more trouble than it was worth.

Hours to complete: approx 20. I lost count. As I made it in stages.

First worn
: For the photos for this blog.

Cost: Straw hat £4, Bias binding left over self made so free, Linen type fabric less than a metre approx £3, Feather £1, ribbon reused, less than metre of chiffon £2. Total £10 approx.


This was the bonnet before:


I cut off the crown. Made a gathered material one instead. Reused the ribbon. Bound the cut edges with biasbinding. Added a loop and button so I could adjust the fit.
The veil is a peice of shiffon with a rolled hem. I pinned it onto the bonnet for a quick change.

And After: