"Resign yourself, Catherine! Shops must be visited! Money must be spent! Do you think you could bear it?" - Northanger Abbey

Tuesday, May 13, 2014

8th Doctor Cosplay - Version 2 - Part 1

So yes I successfully finished my 8th doctor cosplay and wore it to the 50th anniversary celebration at Excel London.


That was based on mixing both the movie version and the big finish version. Now, since then I've seen 'Night of the Doctor.' And well....can't resist recreating that outfit in my own inimitable way, and where better to wear it but LFCC 2014. I've booked a photoshoot with the eighth doctor himself Paul Mcgann.
My first choice was do I go for trying to replicate closely or do I go for a clever historical inspired re-interpretation.
The answer was a re-interpretation. First thing I did was isolate the elements, and what time they came from as near as I could....

Waistcoat - 1870's, looks like its been aged. Paisley print maybe?
Shirt - The collar is attached not removable. Probably modern.
Trousers - Hard to tell. But they seem to have seen some wear and tear. I'd guess it was nearer early 20th century.
Boots/Gaiters - Early 20th century again. Laced at front not buttoned at side.
Coat - Has hallmarks of victorian/edwardian. Curved back seam, vents, interesting collar, double breasted. Covered buttons? Couldn't see if it had waist seam or not.
Neckerchief - Blue worn.

My options:
Waistcoat - Self drafted (using modern waistcoat as a base I added curved back seams and darts) to imitate 1870's bodice. In paisley, lined and boned with self painted buttons.
Shirt - Modern. I could make my own from scratch but I thought this one worked well. Tea Dyed to give aged look.
Trousers - Instead of trousers chose skirt 1909 pattern. In tan material worn over a petticoat. The skirt has two 'watch pockets' near the waistband.
Boots/Gaiters - I already have boots quite similar. I just need to make the gaiters.
Coat - I have a 1909 based jacket pattern that came with the skirt pattern.
Neckerchief - Easy to make with some leftover blue cotton.
Concept sketch (with coat)

Concept sketch (without coat)

I've take a few nods from this 'travelling suit'. Or should I call it a 'time' travelling suit. ;)

Saturday, May 3, 2014

HSF 2014 - Challenge #8 - UFO/PHD (Tudor smock)

The Challenge: #8 PHD/UFO - Tudor Smock
Fabric: Cotton.
Pattern: I used the Tudor Tailor book as reference for the 'shapes' using my knowledge of how I make chemises.
Year: Tudor
Notions: Embroidery floss.
How historically accurate is it? the 'pattern' and shapes are correct. I took inspiration from janet arnolds patterns of fashion for the embroidery. I did most of it by hand. Only the buttonholes were done by machine (but they aren't correct either but then its for convenience). Its close enough for me.
Hours to complete: Lost count as it was a ufo.
First worn: N/A
Total cost: Probably around the £10 mark.

So this challenge was all about finishing PHD (project half done), UFO (Un-Finished Objects). So I started with the smock/nightdress I was planning to make for the fairytale challenge. It had been left unfinished as I couldn't get it to fit right and the collar just didn't work.
Original 'Smock' nightdress

 So first thing I did was remove the collar and cut the neckline into a lower square shape. Then I finished off the sleeves with buttons.
 I then embroidered the neckline and added some eyelets down the front. So I could spiral lace it. I also found once I'd changes the nackline it kept slipping off my shoulders so added a little tuck in the cb to make it a bit more stable.
The item itself is complete I just need to make some lacing thin enought to get through the eyelets.

Saturday, April 26, 2014

I'm spinning around...

I'm trying spinning!
No not the exercise thing with bikes....what kinda gal do you take me for? I don't go to gyms. lol!
What I'm talking about is spinning wool on a drop spindle.
 I ordered a beginners kit from Hilltop Cloud shop on etsy.
The kit has different types of wool in it....I I get to figure out what type I get along with. It came with a booklet with clear instructions on how to get started.
 I found it easy to get the basics...but actually having control of what thickness of thread I'm getting and drafting consistantly is going to take more practice.
 You can see above how I fluctuated between thick and thin. Its lovely material to work with...I found my hands were all soft afterwards. Wonder if that was the lanolin?
As the first fibre I used as a little surprise additional sample (reminded me of a foxes tail in colour) it wasn't long enough to wrap round chair back as instructions said...so I improvised with a hair grip I bought but couldn't figure out how to use ages ago 
 I then decided just to have a go plying it. Then crocheted a little bracelet (below).

All very exciting!

Thursday, April 17, 2014

18th Century Bedgown - Measure once cut out twice...

Well those familar with the instructions for the 'Manteau de Lit' the bed gown a sort of informal wrapover jacket. Rather like a modern dressing gown.


I made mine using instructions on http://www.marquise.de/en/1700/howto/frauen/18mdelit.shtml

First off it took me a lot of puzzling to work out the measurements I need....partially caused by hopping between metric and imperial measurements. I know my size in inches but I measure fabric in cms. I know bit odd. The other thing was working out how loose I wanted it. I did a 'mock up' in some polycotton...which was fortunate as I messed it up first time round.
I only had 2 metres of fabric to work with and I'd chosen a blue and white stripe...so no chance of fudging it.
I folded the fabric over and made sure the top of the sleeve was where the fold was...I chalked a line down the middle of that folded peice. Used that as my centreline. Measuring and chalking out the lines. Then folded it again at the centreline and pinned it to keep it from shifting while I cut it. Then unfolded remembering not to discard the leftover peices. I cute down the centrefront of the peice that would be the front to allow it to be put on. I pinned the arms and tacked the 'sides' in place.


I then cut the square gussets from the offcuts. Which were inserted the same way as you do with a chemise/shift. Before I sewd the sides. Then I pressed the side box pleats and sewed them in place.
I then used more offcuts - two long strips sewn together and attached it along the neckline edge.
DISCLAIMER - This was me making it up as I didn't understand the instructions.
 I then put the gown on the dress form to check the fit. I pinched out the box pleat at the back.
In the above image it was tacked all the way down. But I'll release the bottom skirt length at the back of the pleat once its pressed.
 Hmmm...I think it may be a bit too long. And its a bit..wonkey. I think that's due to my fudge with the collar. Any suggestions?

Thursday, April 10, 2014

HSF 2014 - Challenge #7 - Tops and Toes (shoes)

The Challenge: #7 Tops & Toes
Fabric:
Pattern: none. But did use a combination of several tutorials. I was inspired by combination of American Duchesses 'how to decorate pemberley shoes tutorial and the image below.


Year: 1790's-1810
Notions: Acrylic Paint, Ribbon
How historically accurate is it? The Materials are all wrong...but I'm going for the impression. So the shape is right pointed toes very small heel. Secured on foot by ribbon.
Hours to complete: Because of drying time a couple of days.
First worn: For photos
Total cost: paint was 2 for £5, Ribbon was about 50p metre. So wouldn't me more than £10 Max.

Started with my original shoes...which I wore the first time I went to the jane austen festival.
But they now look scuffed and the ribbon frayed. The perfect candidate for a makeover.
First thing I did was look up every tutorial I could find and images of 1790's shoes.
It seemed the way to go was to use acrylic paints. First I removed the ribbons. Then I cleaned the shoe in preparation.
I had purchased two acrylic paints a white and a blue. I started by painting a layer of the white paint as a base. This was clearly not going to do. So after it had dried painted another layer. Still not complete coverage. So a third layer was needed. I then left it for 24 hours to thoroughly dry.


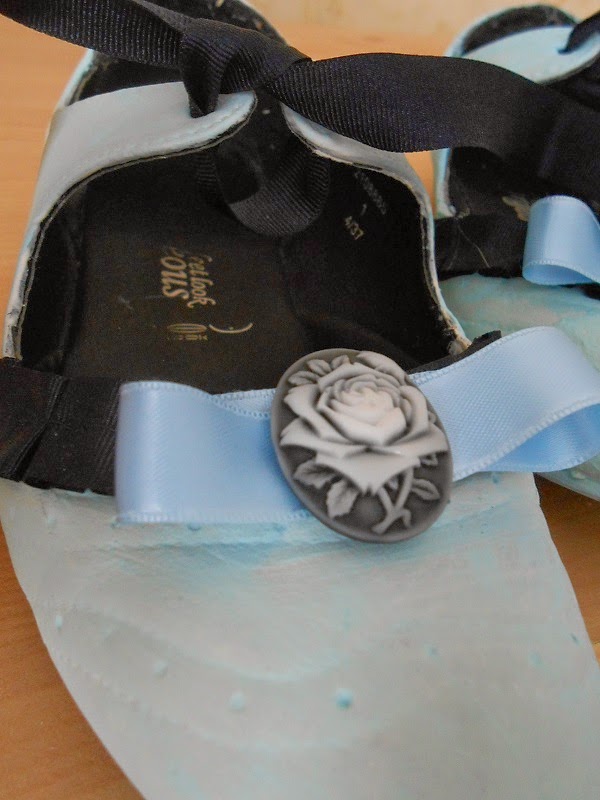
I then mixed a very small amount of the blue with the white. Painting on the final layer. The brogue indentations in the shoe were as disguised as I could get them.
I then began work on the trimmings. Pleating grosgrain ribbon.
Glued on to the front. Then made two bows with a cameo in the centre.
Wasn't sure about how to place the bow...but after a little experimentation.

Put the bow and cameo on the front. I also used the same ribbon I used for the decoration to tie closed the 'latchet' type closure.


Thursday, April 3, 2014

HSF 2014 - Challenge #6 - Fairytale ('Edwardian Tinkerbell')

The Challenge: #6 Fairytale - Edwardian Tinkerbell
Fabric: Green polycotton.
Pattern: I used Mccalls waistcoat pattern as a base then modified it significantly.
Year: 1895-1910 Going for Edwardian look to coincide with when the play was around.
Notions: Boning, hook and eye
How historically accurate is it? Well the fabric is wrong. But I think it gives a nice look. I wasn't aiming for a specific date more the feel of the era as of course this is 'fairytale'. I doubt Tinkerbell would be reading the fashion magazines. But she might have seen humans from a distance and tried to copy.


Hours to complete: I lost track but it was quite quick after I had burst of inspiration. Wanted to do a shirt with peter pan collar...but ran out of time.
First worn: To take photos.
Total cost: I'd say at a guess £8?
Its worn with this skirt and this shirt.

And because I couldn't resist a little photoshopping....

Sewing bee - WWID - week 6

Vintage.
At last something I'm familiar with...they had the extra 'callenge' of a vintage machine. Vintage machines I find much more simple unless you want to zig zag seams and make buttonholes.

1930's Blouse
I love that blouse. I like the cute collar the sleeves. The lack of horrible zips. (Always prefer placket to zip for closures). Now I know I won't be able to get hold of the original but when I get a bit of time I may try to drape something similar or modify a modern pattern.

Upcycle Suit
I've seen quite a few of those british pathe videos on how to turn suits into other clothes. So I'd probably have made a pinafore dress from the trousers.

Coat Vintage or Historical
I was a bit disappointed they all went for vintage and no one tried historical. There are some lovely historical 'coats'. Although I wonder if a spencer or a pelisse would be of high enough difficulty. ;)
Loved all the 50's style coats and thought the uniformed coat was very smart.