"Resign yourself, Catherine! Shops must be visited! Money must be spent! Do you think you could bear it?" - Northanger Abbey

Wednesday, May 30, 2012

Handy Headscarves - a short tutorial

So I have a scarf I bought from a well known shop in a sale which I love. I use it all the time when I set my hair in curlers etc. as well as, as a headband. Now I plan to make a few in different fabrics. My first one I'm doing in a blue polycotton using my existing scarf as a template. Just to get my eye in before I use silky-er material. This project is a good introduction to hand sewing if your a bit scared of it. As it can be done entirely in running stitch which also makes it fairly quick little project. 


I believe the same principals can be used to make handkerchiefs.


First I cut out a square of 60cm/24inches give or take a few millimeters.
white line shows where I've sewn.


Then about a centimetre in from the edge I did a running stitch like a boarder running around. 
About a thumbswidth


Before you ask my 'technique' comes from reading how to do it on a machine and trying to translate it into hand sewing. As every internet tutorial assumed you wanted to use a machine.


Trim (as you go) up to within about 5mm of the running stitch you did...


It's best to do it in sections to stop your newly cut edge fraying so close to the stay stitching.


Tip: Start a little way from the corner...as otherwise it might be a bit tricky when you complete the circuit to fold over the corner.
First 'roll' of edge fabric pinned


Then you just 'roll' a couple of centimeters/inches of the side length over about one and a half times as tight as possible. I then pin that first bit down before I start. 


I cast on my thread and now you have two options running stitch over the top of the 'rolled edge' or you can slipstitch it. I prefer running stitch as its quick.


Tip when doing running itch try to get as many as you can on one needle...makes it quicker.


Continue all the way round your square and there you have your headscarf ready for tying.


Great for those vintage hairdos or when your setting your hair in preparation.

Friday, May 25, 2012

High Waisted Shorts/Tap Pants/PJ Shorts

I'm going to use my fave sewing pattern again...this time to make some high waisted shorts.


Depending on how my first attempt turn out they'll either end up as PJ shorts/'tap pants' or normal shorts.

I saw the spotty shorts shown above in a shop and tried them on. Perfect except they were just that little *too* short. I'm hoping making my own will let me adjust the length to something I find comfortable without it looking to old and frumpy. I have some sanaps I could use for the closure instead of a zip (why am I always buying zips?)

Now...fabric choice should I go for normal cotton/polycotton or be adventurous? Only thing I've got in my stash is 2 metres of 100% cotton (floral, about a metre of blue polycotton) and some synthetic silk haboutai.

Friday, May 18, 2012

Follower milestone - Sewing Pattern Giveaway!


I have 13 whole followers (well 12 really as one of the followers is me but lets not quibble over such things.)
I'd like get up to 20 followers at least...I'm not greedy.

I'm afraid as I don't have a bit stash of patterns I only currently have 1 to give away.

Simplicity K2588
Size 12-20


I accidentally ended up with two copies...long story so I have ONE spare to give away for FREE....yep that's free.
All you have to do is link to my blog from your blog letting people know its there. Then as a reply post where you posted the link...if that makes sense? You have till the 1st July 2012 at Midnight GMT to enter. When I will pick a post-er as a winner.

So get posting! :)

Tuesday, May 15, 2012

Pleats, skirts and swishability!

Not only have I had this song stuck in my head since I heard it I love their outfits.


I love the swishability* of the skirts. You can see all the movement is emphasized by the pleated skirts. Only question is how with long sleeves she isn't melting?? lol

So what are your fave film outfits? Do any inspire you?

*Yep. Skirts all have a swishability rating.


That video reminds me of this one with the skipping.

Monday, May 14, 2012

Natural Fibers Contest - Skirt

Yep I'm entering another contest. It's not the winning that counts its the taking part...and showing off what you made. lol!

Natural Fibres Contest


So I have purchased myself  2 metres of fabric. Olive green and white polkadot. I have also got some black bias binding to turn into piping. I will definately be making the skirt a smaller size so it sits on the natural waist this time. Using simplicity 4044.


The Review


This is the 2nd time I've sewn a skirt from this pattern. Its such a versatile pattern and simple to put together once you get the hang of the CF 'dip'. Chose some fab polkadot fabric (100% cotton..I remembered to ask the shop assistant this time) and I think the black piping just gives it a stylish twist.

I think next time I will have to make the waist even smaller, but keep the hips the same size or maybe make the darts bigger.

I did have a few issues with the facing due to not thinking I needed to look at instructions again. And thus not leaving a gap for the zip and not connecting the dip till I pit in the piping.
But it worked out for the best after a quick 'adaptation'.

I also for the hem used the bias binding but made it very thin so it gave the impression of piping.


I sewed the whole skirt by hand, no machine help this time....already worn it twice.
Front

Back

Tuesday, May 8, 2012

On Yard Challenge - project 1


The One Yard Challenge


I know my original plan was to make an apron....but then I thought 'that's too simple'. And went to make some regency stays only to find that's 'too difficult' to complete in the time I had left. Plus I needed some kind of camisole or chemise to try the stays on with. bingo!
That's what I can make...a top. I didn't have a pattern so found the comfortable top I could wear that wasn't stretchy. And for first time attempted to draft a pattern from a RTW garment. As it was so simple I could erm...trace round the panels easily and add seam allowance. Then the challenge of fitting it on a 'yard' of material.
The top I was originally planning on making a drawstring round the collar edge (like the original top) but....I don't have any matching chord. So I'm wondering if I should make a little pleat to take in the fulness or leave as is.

As trim doesn't count in the final tally I made myself some bias binding and bound the collar and sleeves.
Rolled Hem

And I did a rolled hem and bottom edge of top.


So on skills list can tick off:
Rolled hem
Making own bias binding
Making pattern from RTW garment


Friday, May 4, 2012

Random Skirt!

Well if you have been reading my blog you know the skirt I cut out had to be scrapped due to there being imperfections in the fabric. 

Or so I thought.....

Instead of attaching to the bodice I've made a separate skirt using some reclaimed elastic, bias binding and hook & eye. (I will still be buying more fabric to make the skirt for the 'dress').

I embroidered the skirt and added a pocket to 'cover up' the problem area.
embroidery detail
This was all completely improvised so its not the neatest. With the adition of my underskirt to make it stick out I can wear it for retro dance or clog practice.


Tuesday, May 1, 2012

Simplicity 4990 - Bodice


As I have done most of the bodice - as I'm making it into a dress - I thought I'd review it so far. One thing I need to point out is I usually prefer simplicity patterns for their 'simplicity'. I find them easy to follow compared to others, but this time round I was disappointed. The instructions for the bodice were very confusing. As it referred to back front without clarifying if it was the lining or the fashion fabric.
This led to a few mistakes which I had to fix. So lets point out the problems and solutions. I did I admit end up with my own vague interpretation of the instructions.


First off I pinned all the lining together and sewed it up...only to realize later that what I needed to do was (after unpicking one side) just sew the curved back bits to the main back, and the curved front bits to the front. This needs to be done separately on the lining and fashion fabric.

Then put right side of fashion fabric to right side of lining. Back section to back section, front to front.
Then sew long armholes, straps and neckline ONLY on both front and back. Then you can turn straps inside out and press. The next bit is clear enough in the instructions.


Its all ready now for me to add the zip. Which I won't do till I attach the skirt which has now been cut out. I went for the pattern accompanying skirt. But will be making it sit a little higher and tried to be generous with the cutting.


Update:

I cut out the skirt to find right in the middle the fabric was threadbare an a small patch. Grrr! Now I'm going to have to buy more material and re-cut the skirt. Which means delays again.

Update 2:
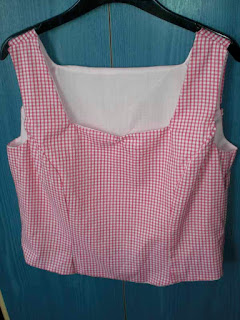
So...I decided to make it as a bodice on its own just like original pattern...well apart from the sweetheart neckline.
adapted neckline

zip

back

front finished